| RoboBuddy Assist User's Guide Ver. 4.01 |
| Update: Sep. 26, 2025 |
|
Currently Details site is in English. If you want to display in another language, Please use the translation function of your browser. |
 ・ Introduction ・ What is RoboBuddy Assist? ・ Installation Method ・ Using for the First Time ・ Screen Display ・ HP Display ・ UI Trend Graph Display ・ AI Operation Assist ・ Update Procedure ・ Backup Procedure ・ View Other Users' Data ・ Uninstallation Procedure ・ Registering a Licensed Version ・ Multi-display environments ・ Using Two PCs by One User ・ Dark Mode ・ With Other Systems and Services ・ Foreign Language Versions |
■ Introduction Thank you for using RoboBuddy Assist. Background of the Software Concept The original concept of this software is for the software robot to act as a buddy, assisting people in their work so that they could work together. By "robot buddy," we mean a software robot that acts as a "work buddy" for each worker. ■ Visualization of Fatigue Level by HP Level Your PC workload fatigue is visualized and quantified as an HP level, which is then presented to you.This allows you to objectively understand your condition and manage your work autonomously by taking appropriate breaks or reassessing task priorities.
■ AI Operation Assistance Function The robot learns your daily computer operations and automatically assists you with your operations.Learning is, for example, clicking on objects (text, etc.) displayed on a computer with a mouse. Then the robot learns what you are operating next. Through learning, the robot will predict what you will operate next and operate it for you. Depending on how you use it, this is an effective AI-based operation assistance function.
We would like to actively incorporate feature requests for this software. |
||||||||||||||||||||||||||||||||||||||||||||||||||||||||||||||||||||||||||||||||||||||||||||||||||||||||||||||||||||||||||||||||||||||||||||||||||||||||||||||||||||||||||||||||||||||||||||||||||||||||||||||||||||||||||||||||||||||||||||||||||||||||||||||||||||||||||||||||||||||||||||||||||||||||||||||||||||||||||||||||||||||||||||||||||||||||||||||||||||||
|
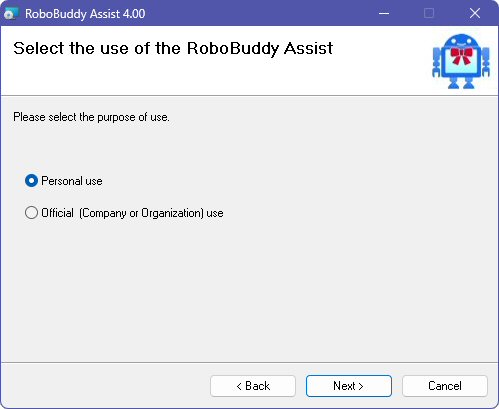
■ What is RoboBuddy Assist? RoboBuddy Assist is a software robot that supports your labor management and operations during PC-based work as your personal robot (buddy) [Overview of Quantification and Visualization] ・AI operation assistance powered by machine learning ・Working on your own PC Fatigue level The rest HP Level Displayed as (anti-fatigue function) ・Provides real-time notifications via balloon messages about operation time and operation volume ・Displays mouse and keyboard usage in a time-series graph ・Displays operation volume and operation time of executed file ・Displays mouse cursor movement distance ・Displays a list of pressed keyboard keys in order ・Best record display of past operation counts ・Displays cumulative operation count (trip meter) [About the AI Operation Assist Function] The function that allows the robot to learn your operations and operate in place of the AI is AI operation is realized by the engine (API). RoboBuddy Assist automates operations using machine learning based on human operation. Robowiser uses a robot's API to teach it how to make the same decisions and perform the same operations as a human when working on a computer (low-code programming). This automates the process. [Visualization of Workload] By quantifying the number of repetitive operations a person performs on a computer, it is possible to estimate the time required for the operation before being handed over to the RBF software robot. The reduction in workload is quantified and visualized. ■ Installation Method
[Main flow]
Once these steps are complete, the installation is finished. RoboBuddyAssist will launch automatically after installation. [Note] * After this, RoboBuddyAssist will start automatically upon Windows logon. * After installation, the User Account Control (UAC) notification level will be set to the lowest level (Level 1: No notifications). This ensures a smooth and uninterrupted user experience. You can restore your preferred notification level after installation if needed. [Manual Launch] Click the [Start] button, then the [All] button, and then click the RoboBuddyAssist icon to start it. If necessary, pin it to the start. [How to Set Exclusions for Microsoft Defender] Right-click the [Start] button and click [Settings]. Click the following in order: 1. Click "Privacy and Security" on the left menu 2. Click "Windows Security" on the right menu (hereafter referred to as the right menu). 3. "Virus and threat protection" 4. "Manage Settings" 5. "Exclusions" The following screen will appear. Click "Add or remove exclusions" Follow the steps below to register the RoboBuddyAsist.exe file as an exclusion. 1. Click the "+ Add Exclusion" button 2. Select "File" 3. Select the RoboBuddyAsist.exe file. [Reference] If you are running third-party antivirus software, please add exclusions. [How to Disable Auto-Start on Windows Login] If you want to disable automatic startup of this software when you log on to Windows: Click the RoboBuddy Assist icon on the taskbar to display the Home screen. ↓ Click [Set] in the left menu. ↓ Setting display item (15) Select Automatically start this software when logging on to Windows. No: Do not start automatically. Yes: Start automatically. RoboAct:Start automatically and also activate the robot icon on the desktop. [Notes on Display Resolution] Do not change the display resolution after launching the software for the first time. Changing the resolution may cause incorrect calculation of mouse cursor movement distance Additionally, if the display resolution is changed while the software is running or after it has closed, the AI operation assist function may fail to correctly recognize object positions. If you change the display resolution, you will need to reset the robot’s machine learning database. If this software is running on the remote desktop PC, When connecting via Remote Desktop, connect with the default connection (do not change any options) The screen size of the display resolution may be changed. In that case, set the display resolution to the same screen size as the PC you are connecting to via remote desktop. 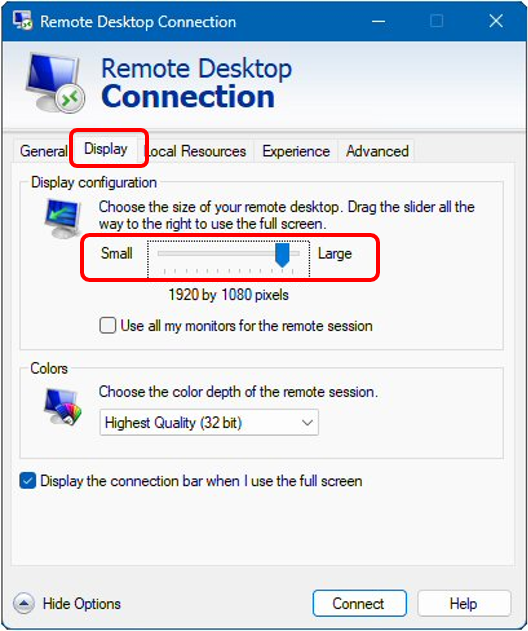 Use the slider on the screen above to set the display size to the same as the PC you are connecting to. To change the display size of the connected PC, right-click on an empty area of the desktop screen. Select "Display Settings" and the size will be displayed in the "Display Resolution" section. ■ Using for the First Time
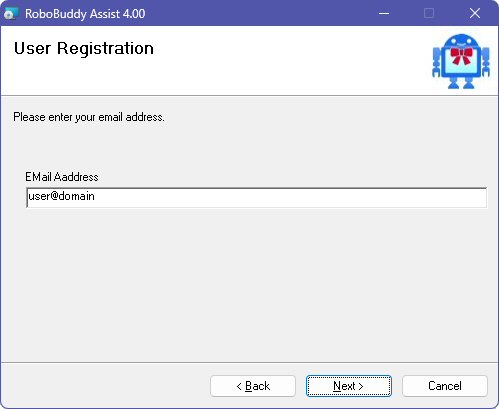
When you run RoboBuddyAssist.exe for the first time, the initial setup screen will appear.
Please follow the prompts and click the "OK" button to complete the setup. Once the software starts successfully, a robot icon will be displayed on the right side of the taskbar. 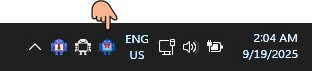 If the icon is not visible, click the “^” on the taskbar to check if the robot icon is hidden there. We recommend setting the icon to always be visible on the taskbar. To do this, click the “^” to open the hidden icons, then drag and drop the robot icon onto the taskbar to make it permanently visible. Clicking the robot icon on the taskbar will open the Home screen. To exit the software, right-click the robot icon and select “Exit.” [When Starting For The First Time or No Previous Data Exists]
【Notice】
■ Explanation of Screen Displays
・ Home Screen
・ Archive View Screen ・ Archive Report Screen ・ Keyboard Button Press Down Information Screen ・ Set screen (RoboBuddy Assist Setting Screen) ・ MagicPacket Send Screen ・ Robo Balloon Message Setup Screen Note: When you hover the mouse cursor over screen items or data, explanations will be displayed as needed. Please refer to those for more details ■ Home Screen 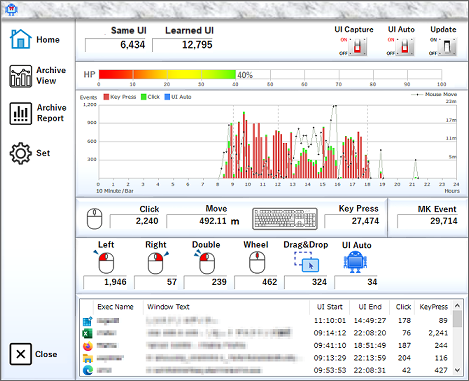 Note: The screen images have been partially modified for explanatory purposes. You can display the Home screen by clicking the robot icon on the right side of the taskbar. Right-clicking the robot icon on the taskbar will display a pop-up menu, allowing you to select and display the desired screen. In this software, PC operations are abbreviated as UI (User Interface). Similarly, key presses are abbreviated as Key Press.
Clicking the robot icon moves it onto the desktop screen, where it notifies you of your current work status via balloon messages. The robot icon operates on the desktop in a way that does not interfere with your work. If you want to stop the robot icon’s activity on the desktop, click the active robot icon to return it to the top-left corner (original position). ■ Robot Icon Behavior on the Desktop
[If the Moving Robot Icon Distracts You] You can tune the robot's activities and balloon messages. Click Set on the left menu to tune. Hover your mouse cursor over screen items or data to see explanations as needed. 【Additional Notes】 - Clicking a balloon message will dismiss it. - If the robot icon’s movement becomes unusually slow, click anywhere on the desktop background to move the icon to the bottom edge, which will automatically adjust its speed. - The robot icon is displayed at the top of the Z-order but may be obscured by other windows. In such cases, ensure no foreground window is active and move the icon to the bottom edge of the desktop. - Balloon messages may vary or not appear depending on the software version and usage conditions. - Starting the software with the argument option -roboact will activate the robot icon’s activity immediately after launch.
■ "Same Operation Count"
Displays the total number of identical operations performed within window screens.The closer this number is to the total number of machine-learned nodes, the easier it is to automate using our software robots.
■ "Registered Learning Count"
Displays the total number of nodes learned by the robot. [Note] ITo clear (reset) all learned operations, click the robot icon at the bottom left of the Set screen. A confirmation popup will appear for your selection..
■ UI Capture Switch
Turning this switch ON enables the registration of mouse and keyboard operation data, allowing the robot to learn your actions. This switch controls the software engine. When OFF, the operation count will not update. You can toggle this switch ON/OFF at any time using the function key specified in setting (2) on the Set screen (default: None). If the robot icon is active but the switch is OFF, the robot icon will “stop” with its eyes closed on the window title bar.
■ UI Auto Switch
Turning this switch ON enables the AI operation assist function.When ON, if no user input occurs for 3 seconds after any operation, AI operation will start automatically. The 3-second delay can be adjusted in the settings. When OFF, AI operation can be triggered only by specified mouse operations. If the UI Capture switch is OFF, all AI operation assist functions are disabled. You can toggle this switch ON/OFF at any time using the function key specified in setting (3) on the Set screen (default: None).
■ Update Switch
Updates the data displayed on the Home screen. Pressing F5 while the Home screen is active also refreshes the data. Data is not updated automatically and requires manual refresh using this switch. Note that data will not update until the save cycle (default 1-minute interval) has elapsed. If the date changes while the screen is displayed (the next day), the updated date will be shown after the save cycle completes.
■ HP Level Display (Remaining Energy Level for Your PC Work)
 Your PC work fatigue level is displayed as your remaining HP (Human Power) for the day you can work. HP is calculated based on past operation data, so if no past data exists (e.g., first launch), it will display 100%. The HP level display will start from the day after the first launch. [How Maximum HP Level Is Calculated] Based on ergonomic studies and past analyses of PC operation and fatigue, a proprietary algorithm is used. The HP level is designed to approximate actual fatigue (mental stress). [Reference Data Used to Calculate Fatigue Level] 1 mouse click: 1 fatigue level 1 keyboard key press: 1 fatigue level 500 pixels of mouse movement: 1 fatigue point Operation time: fatigue points calculated in 10-minute intervals based on activity [Expected Benefits of HP Display] After accumulating about 30 days (4 weeks) of past data, the current HP level can help you recognize errors, cognitive mistakes, forgotten settings, stress levels, and more related to your PC work capacity. For telework, it can help prevent overwork and provide evidence of workload to supervisors. Based on Our Research for Users with Over 60 Days of Data  Sustained concentration begins to decline below 50%, affecting typing, coding, flow creation, and document writing abilities.  Concentration significantly decreases between 20% and 40%, increasing the likelihood of judgment, operation, and recognition errors.  Below 20%, it is advisable to finish PC work at a convenient stopping point. Postponing tasks to the next day may improve efficiency.  At 0%, you have exceeded your PC work capacity. With limited past data, HP levels tend to drop to 0% more easily. Similarly, with fewer usage days, HP levels may decrease faster. Also, with limited data, you may frequently exceed your best record, so please be aware of this.
■ UI Trend Graph Display
Displays a stacked bar graph of today’s mouse clicks, keyboard presses, and UI Auto counts, along with a line graph showing mouse cursor movement distance on the monitor. Each bar represents operations within a 10-minute interval. Click counts exclude wheel operations and clicks on the desktop background. Keyboard press counts exclude repeated inputs from long key presses. [Reference: Typical PC Work Graph Trends] (Graphs are based on actual data) ■ 9:30~19:30 (8 hours of work + 1 hour of overtime) 
■ 9:30~19:30 (8 hours work + 0.5 hour overtime) 
■ 10:00~19:30(8 hours work) 
■ 10:00~19:30(8 hours work) 
■ 8:00~17:00(8 hours work) When using applications that mainly involve mouse operations (such as website creation, image editing, CAD, etc.) for PC work, the graph tends to show a higher number of mouse clicks (in green). 
■ 9:30~12:00 (Half-day work: 2.5hours work) 
■ 8:00~22:30 (8 hours work + 5.5 hours overtime) 
This graph clearly shows overwork. Immediate strict warning is necessary. In telework, there is a tendency to overload tasks. Furthermore, people tend to neglect breaks and meal times due to excessive concentration. In telework, each employee needs to manage themselves independently. In cases of overwork, this software’s robot will send a warning message (notification). Since this software’s self-labor reporting is basically self-declared, users are expected to thoroughly manage their own work by reviewing their own graphs. If necessary, it is required to capture the ‘Home screen’ and submit it to the supervisor for management. Alternatively, right-click on the operation information list for each executable file at the bottom of the UI trend graph screen to export a CSV file, and submit the exported CSV file for management. ■ 9:00~18:00 (8 hours work) 
This graph clearly shows slacking off during telework. Immediate strict warning is necessary. In the modern era, evaluation is based more on results than on hours worked, so it depends on the content of the work performed during telework. However, it seems necessary to confirm what was done if no PC work was performed. There are naturally employees who cannot manage themselves, so measures need to be taken for them. Since this software’s self-labor reporting is basically self-declared, users are expected to thoroughly manage their own work by reviewing their own graphs. If necessary, it is required to capture the ‘Home screen’ and submit it to the supervisor for management. Alternatively, right-click on the operation information list for each executable file at the bottom of the UI trend graph screen to export a CSV file, and submit the exported CSV file for management. If there is almost no PC UI operation, the HP level will be 90% or higher, so there is also a management method that simply notifies the supervisor of the HP level. ■ 9:30~19:30 (8 hours work + 1 hour overtime) 
This is the graph display on the home PC side when working by connecting to the office PC via Remote Desktop (RDT) from home. Due to the nature of Windows, when the RDT is displayed in full screen on the home PC and work is performed, the UI events on the home PC side consist only of mouse movement events. If the RDT screen is displayed in a normal window, UI events occur on both the office PC and the home PC. The UI operation information on the office PC side is displayed in the graph as usual.
■ "Click" Display
Shows the number of mouse clicks, including:Left button single clicks Right button single clicks Left button/double clicks Total drag-and-drop operations with the left button Wheel operations and desktop background clicks are excluded. Back/Forward button clicks are counted as left button single clicks.
■ "Move" Display
Shows the distance the mouse cursor has moved on the screen (logical coordinates). Distance is displayed in meters, converted from pixel values based on monitor size and DPI settings. Changing the monitor size in the Set screen will affect the displayed distance and graph. <Comparing Mouse Movement with Others> Setting the same monitor size allows for fair comparison, but larger screen sizes tend to result in greater cursor movement due to larger physical movement areas.
■ Keyboard Icon Button
Displays a keyboard layout showing the press status of each key pressed today. Refer to the keyboard layout explanation for details.
■ "Key Press" Display
Shows the total number of key presses today, excluding repeated inputs from long key presses
■ "MK Event" Display
Shows the combined total of mouse clicks and key presses today.
■ "Left / Right / Double / Wheel / Drag & Drop / UI Aut" Display
Shows the total counts of mouse button operations today, excluding clicks on the desktop background.
■ "Operation Information List by Executable File" Display
Shows operation information for each executable file used today. In the Enterprise version, right-clicking the list allows exporting the displayed data to a CSV file.
- Clicking a column header sorts the list by that column; clicking again reverses the sort order. - CSV export respects the current sort order. - Columns can be reordered by dragging headers left or right - Double-clicking a column boundary auto-adjusts the column width. - Double-clicking a row opens the keyboard layout screen showing key press details for that executable. ■ Archive View Screen The Archive View screen displays the same data as the Home screen; however, while the Home screen shows data for the current day, the Archive View screen allows you to view data for a specified past date.
■ "Archive Date" Display
Select the past date you wish to view.
■ "Logon User" Display
Displays the Windows user name logged on at the time of operation. If multiple users log on the same PC, the user who logged on last on that day will be shown. Operation counts are accumulated regardless of which user performed the actions on the same PC. [Note] While viewing the Archive View screen, you can also open the Archive Report screen. Clicking a date (row) in the daily operation statistics list on the Archive Report screen will synchronize the Archive View screen to display the selected date. Although you can open the Archive Report screen while viewing the Home screen, clicking a date in the Archive Report will not affect the Home screen display. ■ Archive View Screen 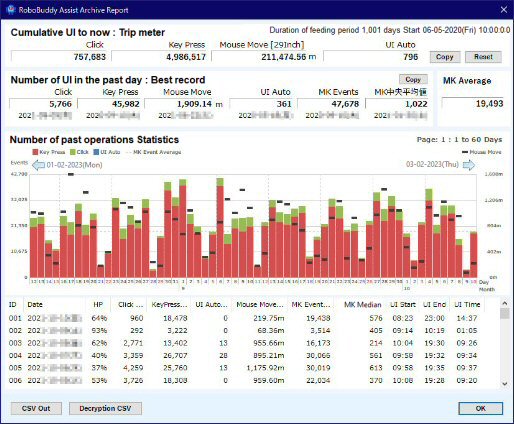 Note: The screen images have been partially modified for explanatory purposes. Operation statistics for the past 60 days (from yesterday) are displayed. The Personal version displays up to 60 days of data (one page only). The Enterprise version allows scrolling to view up to 365 days of data. The Personal version is only limited in the number of days displayed. Data processing and aggregation are performed on all available operation data regardless of version.
■ "Cumulative Operation Count (Trip Meter)" Display
Shows the cumulative counts of Clicks, Key Presses, Mouse Moves, and UI Auto since the start date/time. Click counts exclude wheel operations and clicks on the desktop background. Key Press counts exclude repeated inputs from long key presses. To compare work volume with others, reset the trip meter at the same start time by clicking the Reset button. To compare mouse movement distances, ensure the monitor size is set identically in the Set screen.
■ "Reset" Button
Resets the cumulative operation counts (trip meter). Please note that once reset, previous totals cannot be restored.
■ "Best Record for Past 1 Day” Display
Shows the date and values of the highest daily totals for Clicks, Key Presses, Mouse Moves, UI Auto, MK Events, and MK Median. If multiple dates share the same best record value, the earliest date is displayed.
■ "MK Events” Display
Shows the highest total of “Click count” + “Key Press count” recorded in a single day. This is not the sum of the maximum Click count and maximum Key Press count separately.
■ "MK Median" Display
The daily total of “Click count” + “Key Press count” is aggregated hourly (24 data points for 24 hours).If the number of active hours is even, the average of the two central values is shown. If odd, the average of the three central values is shown. The MK Median represents the average hourly PC operation intensity for the day. Users with higher MK Median values have higher PC operation volumes. For more information on averages and medians, please refer to other resources. The Personal version shows MK Median for the past 60 days (from yesterday). The Enterprise version shows MK Median for the past 365 days (from yesterday).
■ "MK Averag" Display
Shows the average MK Events value. Days without operations (holidays, no data) are excluded from the calculation. All calculations exclude days without operation data regardless of version. The Enterprise version calculates the average over the past 365 days (from yesterday). The Personal version calculates the average over the past 60 days (from yesterday).
■ "Bar Graph Display" Display
Displays a stacked bar graph of daily mouse clicks, keyboard presses, UI Auto counts, MK Event averages,
and a line graph of mouse cursor movement distance on the monitor. Each bar represents the total operations for one day. Click counts exclude wheel operations and clicks on the desktop background. Keyboard press counts exclude repeated inputs from long key presses.
■ "Daily Operation Statistics List” Display
Shows the total operation counts for each past day.
[Notes on List Display Operations] - Clicking a column header sorts the list by that column; clicking again reverses the sort order. - Columns can be reordered by dragging headers left or right. - Double-clicking a column boundary auto-adjusts the column width. [Synchronization with Archive View Screen] When viewing the Archive View screen, clicking a date (row) in the daily operation statistics list will synchronize and display the selected date on the Archive View screen.
■ "CSV Out" Button
Saves the displayed daily operation statistics list as a CSV file. The CSV output respects the current sort order. This feature is available only in the Enterprise version. Clicking the CSV Out button prompts you to choose whether to encrypt the CSV file. If you specify a password, the file is encrypted. If no password is specified, a plain CSV file is created. To decrypt, click the [Decryption CSV] button and enter the same password used for encryption. Encrypting the CSV file helps prevent unauthorized tampering.
■ "Decryption CSV" Button
Allows decryption of encrypted CSV files. ■ Keyboard Button Press Down Information Screen 
Note: The screen images have been partially modified for explanatory purposes.
The keyboard layout display supports only Japanese 109-key, English 104-key, and Korean 104-key types. You can access this screen through the following methods. [Home Screen] and [Archive Report Screen] ・Click the "Keyboard Icon" button. This displays the total key presses and usage rate per key for the selected day. ・Double-click a row in the "Operation Information List by Executable File". This displays the total key presses and usage rate per key for the selected executable file.
■ "Date" Display
The displayed date changes depending on the operation that invoked the screen.For today’s data: Today For a selected past date: Archive Date If an executable file is selected, its name will be shown on the right.
■ "Total Key Pres" Display
Shows the total number of key presses for the selected date.
■ "Rank" Display
Displays keys ranked in descending order by usage rate.If an executable file is selected, its name will be shown on the right. Keys with no recorded presses are shown as None.
■ "Key Name" Display
Shows the name of the key selected by rank. Clicking the key name causes the corresponding key on the keyboard layout to vibrate.
■ "Key Press" Display
Shows the number of presses for the key selected by rank.
■ "Usage Rate" Display
Shows the usage rate of the selected key relative to all keys pressed.Calculation formula: (Number of presses of the selected key) ÷ (Total number of all keys pressed) Keys with no recorded presses are excluded from the calculation.
■ "Relative Rate" Display
Shows the usage rate of the selected key relative to the top-ranked key. Calculation formula: (Number of presses of the selected key) ÷ (Number of presses of the top-ranked key)
■ "Color Mode" Dropdown Menu
Specifies the color display mode for keys on the keyboard layout.
■ "Keyboard Layout" Display
Clicking a key highlights (selects) its rank.
■ "Relative Usage Rate Bar Graph" Display
Displays a bar graph showing the relative usage rate (percentage) of the key selected by rank.
■ "Key Press List" Button
Clicking this button displays a list showing overall usage rates, relative usage rates, and other details for all keys pressed.List Screen Column Descriptions
■ Set Screen (RoboBuddy Assist Configuration Screen)
Please refer to the on-screen explanations.
Note: Hovering the mouse cursor over screen items or data will display contextual explanations as needed.
■ Automatic Startup on Windows Logon
Specifies whether the software starts automatically when logging into Windows.
If set to Yes, the robot icon demonstration will not play upon startup. If set to RoboAct, the robot icon activity will start on the desktop. If no foreground window is found or there is no space between the foreground window's title bar and the top edge of the desktop for the robot icon to operate, the icon will not be displayed. [Note] Do not move the executable file to another folder after setting Yes or RoboAct. If moved, Windows will not find the executable during logon, and the software will not start automatically.
■ Windows Shutdown Timer
Specifies the time to initiate Windows shutdown.
When the timer reaches the specified time, a confirmation screen appears before shutdown. 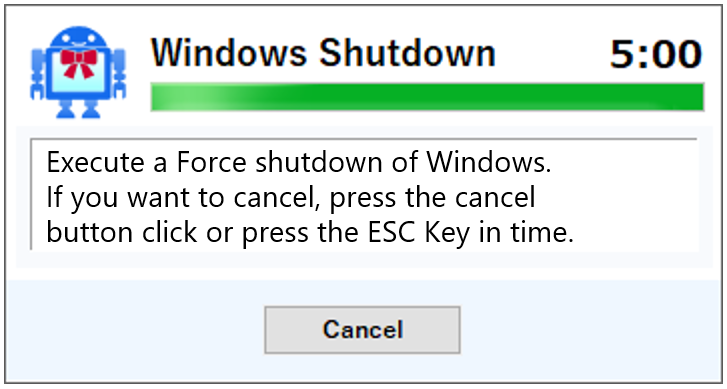 The example screen shows a 5-minute countdown before shutdown. The timer can be set from 1 to 30 minutes in 1-minute increments. The actual shutdown time is: (Timer setting) + (Confirmation wait time) To cancel shutdown, click the Cancel button or press the ESC key. If not canceled within the countdown, shutdown proceeds. If the screen is locked at shutdown time and Force is not selected, shutdown will not occur. If Windows is in sleep mode, the software is inactive and the timer will not run. [Shutting Down Windows via Remote Desktop] If this software is running on Windows via Remote Desktop, and you disconnect the Remote Desktop session (close the window) after setting a shutdown timer, the behavior will depend on the shutdown option selected: If Force Shutdown is selected, the system will shut down automatically. If Normal Shutdown (Enable) is selected, once the shutdown process is initiated by this software, Windows will display the following confirmation screen 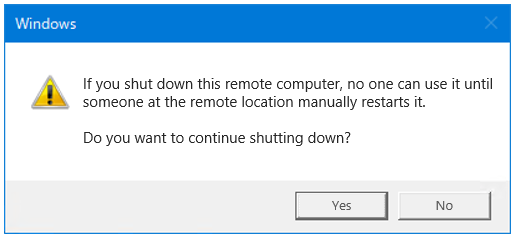 Please note that the shutdown will not proceed unless you respond to this confirmation screen. [Note] This software only initiates shutdown at the specified time; the shutdown process itself depends on Windows behavior. Changes in Windows may affect shutdown behavior. Please refer to the on-screen explanations. *Hovering the mouse cursor over screen items or data will display contextual explanations as needed. *Only the Enterprise version can send Magic Packets. ■ Additional Explanation A Magic Packet is a special Ethernet frame used to power on (start) PCs with Wake-On-LAN (WOL) enabled over the network. To power on a PC via network, the following setup and conditions are required: (1) WOL enabled in the PC’s motherboard (BIOS) settings. (2) WOL enabled in Windows settings. (3) The PC to be powered on (receiving the Magic Packet) must be on the same network segment as the sending PC. For setup details, please refer to the PC manufacturer’s website or Windows WOL configuration guides. [Technical Notes] This software sends Magic Packets via UDP broadcast, which typically does not cross network segments. To send across segments, network devices (routers, L2 switches) must be configured to forward UDP broadcasts. Our OA robots (Robowiser Framework) can send Magic Packets across segments, NAT, and reverse NAT without network device configuration. Magic Packet transmission does not receive confirmation from the target PC. Successful transmission only means the packet was sent, not that it was received or that the PC powered on. This software does not verify whether the target PC has started after sending the packet. [How to Confirm PC Startup] You can check if the PC appears in the MS network computer list. If the PC has a fixed IP, you can use the ping command to check for a response. Note that some PCs with WOL enabled may respond to ping even when powered off; verify the PC’s off-state behavior beforehand. [Remote Work Using Remote Desktop (RDT) to Office PCs] To remotely power on office PCs from home: (1) Connect to the office network via VPN (e.g., PPTP). (2) Connect to a power management PC via RDT. (3) Use this software on the power management PC to power on the target PC. (4) Connect to the target PC via RDT. (5) Shut down the PC when work is complete. This setup eliminates the need to keep multiple office PCs powered on continuously. Only one power management PC needs to be running at all times. <<Safety>> Even if the office PC powers off due to Windows errors or updates, you can remotely power it on and continue working safely from home. To prevent forgetting to shut down office PCs, please use this software's Windows Shutdown Timer feature. ■ Magic Packet Send Screen
Please refer to the on-screen instructions.
* Hovering your mouse cursor over screen elements or data will display contextual explanations as needed.
■ "MAC Address List” Display
Displays a list of registered MAC addresses. Up to 254 entries can be registered (24-bit segment host count).
- Columns can be reordered by dragging headers left or right. - Double-clicking a column boundary auto-adjusts the column width.
■ "Delete" Button
Removes the selected MAC address from the list.
■ "Regist" Button
Adds a MAC address to the list.
■ "Send" Button
Sends a Magic Packet to the MAC address displayed in the input field. Sending is possible even if the PC Name is not entered. You can also send to a temporarily entered MAC address that is not registered in the list. Double-clicking a row in the MAC address list for the desired PC Name will also send the Magic Packet.
■ "Paste" Button [MAC Address Input]
You can either type hexadecimal characters directly into the MAC address input field or
paste a MAC address copied to the clipboard in one of the following formats: ・XX-XX-XX-XX-XX-XX (format output by the Windows standard command ipconfig /all) ・XX:XX:XX:XX:XX:XX Focus the input field and press CTRL+V or click the [Paste] button to paste. ■ Robo Balloon Message Setup Screen
Please refer to the on-screen instructions.
Hovering your mouse cursor over screen elements or data will display contextual explanations as needed. About Windows Balloon Messages Windows balloon messages are the speech bubble icons that appear on the right side of the taskbar on the desktop. They are a standard Windows feature. Note that balloon message notifications can be disabled in Windows settings. [Notes] -“Time Signal” and “Timer Message Notification” are not displayed as Windows balloon messages. These notifications only appear when the robot icon is active. - When changing the monitor size in the mouse cursor movement distance notification, setting a smaller size will reduce the previously accumulated movement distance, and notifications for distances already passed will not be sent. Conversely, setting a larger size will increase the accumulated distance, potentially causing immediate notification triggers. It is recommended not to change the monitor size after the initial setup. ■ How to Use AI Operation Assist
This feature enables the robot to learn your daily PC operations and assist by performing tasks on your behalf.
Working on a computer can be exhausting. To help alleviate this, the robot provides operational assistance. It is designed to support you without interfering with your primary work. When you click on a target text, image, or other displayed object on the desktop (hereafter referred to as “display objects”), and you consistently perform the same sequence of actions, the robot will take over and execute those operations for you.
■ AI Operation Assist: Operation Method
After clicking (or double-clicking) a display object on the desktop, if you do not move the mouse cursor for
the number of seconds specified in the Set screen (4), the robot will predict the next operation and move the mouse cursor
to the predicted display object.Alternatively, clicking the mouse side button assigned as the “forward” button will also trigger the robot to move the cursor to the predicted next display object. If the predicted next display object matches your expected next action, and you do not move the mouse cursor or start typing within the number of seconds specified in Set screen (5), the robot will begin operating on your behalf. If the predicted display object differs from your expectation, moving the mouse cursor or typing will cancel the robot's AI operation. 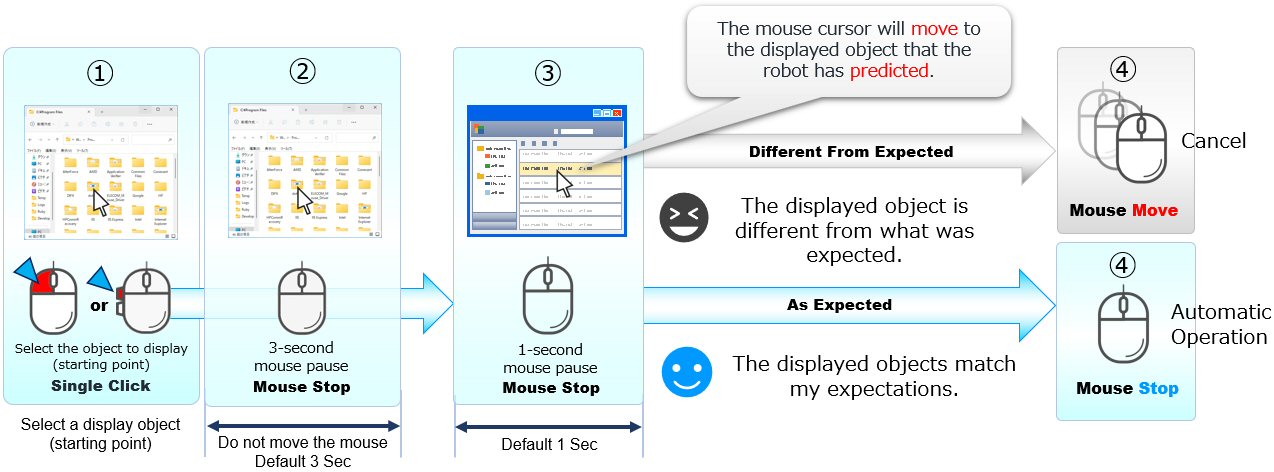 ■ Starting AI Operation (1) When UI Auto is ON  If no mouse or keyboard input occurs for the default 3 seconds, AI operation starts. The robot icon in the task tray will remain red during this state. (2) When UI Auto is ON or OFF
or

Clicking the mouse side button assigned as Forward will start AI operation.  When the robot is predicting the next operation, the task tray robot icon turns red. If your mouse lacks side buttons or they are already assigned, you can trigger AI operation by moving the cursor to the desired display object and performing one of the following: (1) Press [ESC] + left-click (2) Press the function key specified in Set screen (default: F11) (3) Hold the left mouse button for more than 3 seconds, then release ① Click the display object that will initiate the automated operation (the starting point). If you click the "Forward" button, proceed to step ③. ② This step represents the pause after the mouse action in step ①. By default, if there is no keyboard input and the mouse cursor remains stationary for 3 seconds, the process moves to step ③. To change this pause duration, adjust item (4) on the Set (Settings) screen. ③ The mouse cursor moves to the display object predicted by the robot. After the cursor moves, there is a default 1‑second pause. If the highlighted object is the expected one and no human action (mouse movement or key input) occurs within the specified time, the AI will begin automatic operation. Thereafter, unless a human intervenes, AI operations will continue while the robot can make predictions. If the object is not the expected one, cancel the AI operation by pressing any key or moving the mouse cursor in any direction. To change the idle time, adjust it in section (5) of the Set (Settings) screen. When creating documents or developing HTML content or programs, adding about +2 seconds provides a better assist experience.
■ Canceling during AI Operation
If the robot’s AI operation does not match your expectation, moving the mouse cursor or scrolling the mouse wheel will immediately cancel the AI operation. Starting any keyboard input will also cancel the AI operation.
■ Robot Learning of User Operations
Enable the UI Capture switch on the Home screen to let the robot learn from your actions. Learned actions are stored in a machine-learning–based, tree-structured database with multiple branches. [UI Auto Tree Datebase Illustration] 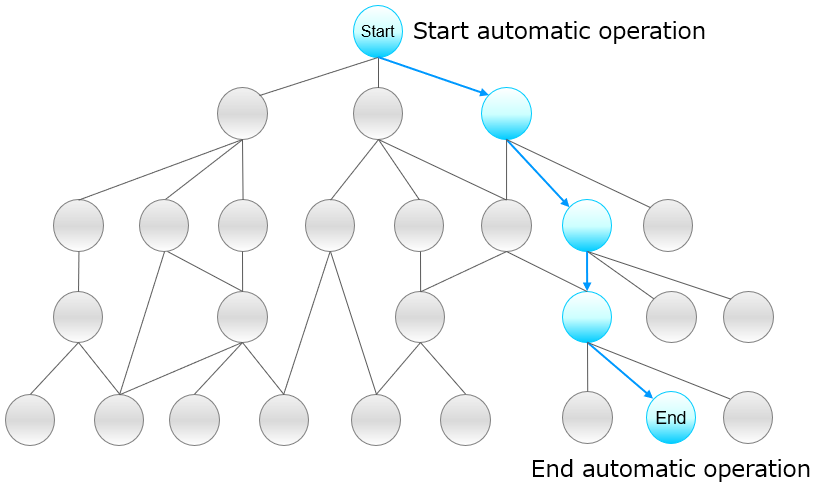 Understanding that the robot’s learning is structured as a tree will help you apply it more effectively. Each operation and its associated display object form a node in the tree. Maximum nodes: Mouse operations: 70,000 Keyboard operations: 30,000 Updated operation data overwrites existing nodes. When operation information stored in a node is updated, it is overwritten with the latest node information. When AI operation starts, the current display object node forms the root of the tree, and the robot predicts the next operation by branching through the tree based on past logs. [Operation Pattern Loops] If you repeatedly perform multiple operation patterns, the robot may learn loops, causing unwanted repetitive AI operations.  To register that no further operations: 1. Click the target display object. Although the action assigned to the display object may still be executed, please disregard it. 2. Then, [CTRL + Click] on an empty area of the desktop. 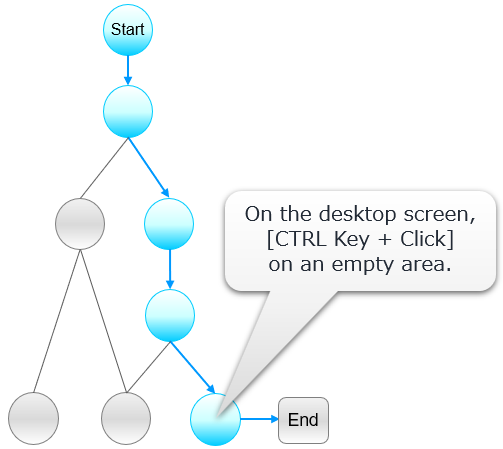 This marks the display object as a “terminal node” with no subsequent operations, useful for outdated or unwanted loops.
■ Registering Consecutive Operation Patterns
To register consecutive operations, perform [CTRL + Click] on an empty desktop area after the last operation. The interval that defines "between operations" for step① is set in item (10) on the Set (Settings) screen. The default interval for consecutive operations is 10 seconds. If the next action occurs within this 10‑second window, it will be recorded as a consecutive operation. If more than 10 seconds elapse, the next action will be registered as "no further operation."
■ Clearing Learned Operation Mistakes
If the robot learns incorrect operations, you can clear the learning for a specific display object by moving the mouse cursor over it and pressing the function key (default: F12).A balloon message will notify you when learning is cleared. New learning will begin from that display object after clearing.
■ Resetting the Learning Database
To clear all learned operations, go to the Set screen from the Home screen and click the Robot icon at the bottom left.
■ AI Operation Details
■ Robot Display Object Prediction Algorithm
The robot prioritizes not interfering with your work.The priority paths for predicting display objects (elements) shown on the window screen are as follows: (1) The path with the highest number of operations (your actions plus automated actions) Selects the display object whose node path has the greatest total number of operations. (2) The most recently operated path by you (default) Selects the display object whose node path has the most recent cumulative operation time. (3) The next operation following your last action Selects the display object corresponding to the next operation after your most recent action. The selection of the next display object is prioritized based on one of these criteria. You can choose which criterion to prioritize in the Set screen(6). The usability of the AI operation‑assist feature depends on its underlying algorithms. We aim to improve the algorithm for better AI assistance. Please share your feedback via the software source or our website contact form. Knowledge gained from AI operation assist is incorporated into our flagship products: ■ Update Procedure
The update process is now complete. ■ Backup Procedure
1. Exit the software.
Right-click the robot icon in the taskbar and select "Exit". Confirm that the robot icon no longer appears in the taskbar. 2. Copy the entire [Installation Folder]/RoboBuddyAssist folder to your backup location. The backup is now complete. [Note] To restore backed-up data, overwrite the [Installation Folder]/RoboBuddyAssist folder with the backup copy. ■ How to View Other Users’ Data
This feature is available exclusively in the Enterprise edition and can be displayed by specifying command-line arguments at runtime.
[Reference] At the end of the work month, labor managers can request the [Installation Folder]/RoboBuddyAssist/Dat folder zipped and sent to them to properly monitor working hours and workload. However, this may be perceived as employee surveillance and cause stress, so it is not recommended. Use it as evidence for self-reporting overwork conditions. [Mouse Cursor Movement Distance] The monitor inch size used to calculate mouse cursor movement distance is based on the monitor inch size and screen size specified in the Set screen. This ensures that movement distances are comparable when using the same monitor inch and screen size. To display movement distances under exactly the same conditions as another user, set the inch size in Set screen (1) to the same value. [Supplement] - Changing the monitor inch size will recalculate the displayed movement distance. The software calculates mouse movement distance by measuring the distance between two screen coordinates where the cursor moved and stores it. Each time the distance is displayed, it converts the stored coordinate distance to meters based on the current monitor inch size setting. - The software’s configuration files are stored in: [Installation Folder]/RoboBuddyAssist/Conf Overwriting these files with those from another user will replicate their environment settings. ■ Uninstallation Procedure
To uninstall, use the "Programs and Features" option in the Control Panel.
Before uninstalling, please ensure that the RoboBuddy Assist application is not running. During the uninstallation process, if the RoboBuddy Assist application is running, you may be prompted to close it. In this case, please check the option to not close the application. 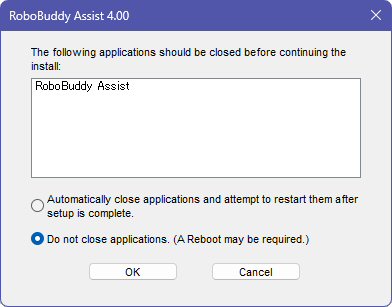 Even if you choose to close the application, the uninstallation will proceed normally; however, since this forces the application to close, there is a rare chance that data files may become corrupted depending on timing. Uninstalling the software will not delete any data or files. If necessary, you may manually delete the installation folder (RoboBuddyAssist folder). ■ Registering a Licensed Version
(1) Place the issued license file in the following folder:
[Installation Folder]/RoboBuddyAssist/Lic The license file will have a .license extension. When updating the license, place the new license file in the folder. Delete any existing license files first. If the new license file has the same name, overwrite the existing file. [Note] 1. Only one valid license file should be present in the Lic folder. 2.Always use the license file provided by the distributor. License files copied from other PCs will be invalid. When the RoboBuddy Assist app reads a license file, it marks it as "used," preventing the same license file from being used on other PCs. 3. License files are not reissued, so please keep them safe. (2) Exit the software and start it again. [Restart] License registration is now complete. You can verify the license details by right-clicking the robot icon in the taskbar and selecting "About." If you start the software with an expired evaluation license, it will display an expiration message and then exit. Placing a valid license file in the folder will restore normal operation. ■ Multi-Display Environments
A multi-display environment refers to a setup where multiple monitors are
connected to a single PC and used simultaneously. The software generally supports multi-display environments automatically; however, depending on Windows display settings and the resolution of added monitors, the software may fail to retrieve expected display device information, causing display issues. - Launching the software on a high-resolution display and then displaying it on a monitor with a different resolution. - Using "Second screen only" mode with a monitor of different resolution. - Remote connecting to another PC where the display resolution differs from the client. In such cases, manually configure the display resolution in the software. [How to Manually Configure Display Resolution]
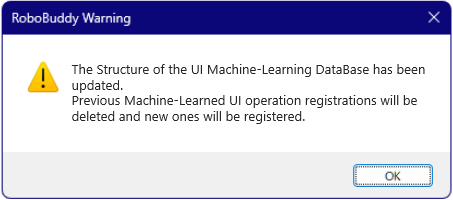
Specify the resolution matching Windows display settings. To check Windows display settings: 1. Right-click any empty area on the desktop and select "Display settings". 2. Specify the same scale and resolution as shown (usually for the primary display, Display 1). 3. Click OK and follow any prompts. The software retrieves display device information only at startup, so a restart is required to apply changes. Note that the software does not restart automatically; you must restart it manually. [DPI Unaware] Use this if display issues persist with Manual settings. When selected, the software’s display resolution depends on the "High DPI settings" in the executable’s compatibility properties. Left-click RoboBuddyAssist.exe, select "Properties," and adjust compatibility settings accordingly. [Limitations in Multi-Display Environments] When using "Extend displays" mode: - The robot icon operates only within the primary display area. - UI Auto functions operate only within the primary display area. 【Notice】 If you add or change displays while the software is running, always restart the software. The software only retrieves display device information at startup. Without restarting, mouse cursor movement distance may be incorrectly processed. After changing display settings, previously registered AI operation data may become invalid and AI operations may not function properly. New operation data will be registered under the updated environment, restoring AI functionality. 【Supplement】 If an abnormal value is set in Manual mode causing the Set screen to become unusable or display corrupted: 1. Exit this software. 2. Delete the file: [Installation Folder]/RoboBuddyAssist/Conf/RoboBuddyAssist.env 3. Restart the software; the initial setup screen will appear. On the initial setting screen, click the display monitor icon No restart is required after initial setup. Note that settings made in the "RoboBuddy Assist Settings" screen will be reset and need to be reconfigured. ■ Using Two PCs by One User
When working remotely and switching between an office PC and a home PC,
you can continue using the operation data registered on the office PC on your home PC by following the steps below. The following procedure describes how to transfer operation data from the office PC to the home PC.
■ Dark Mode 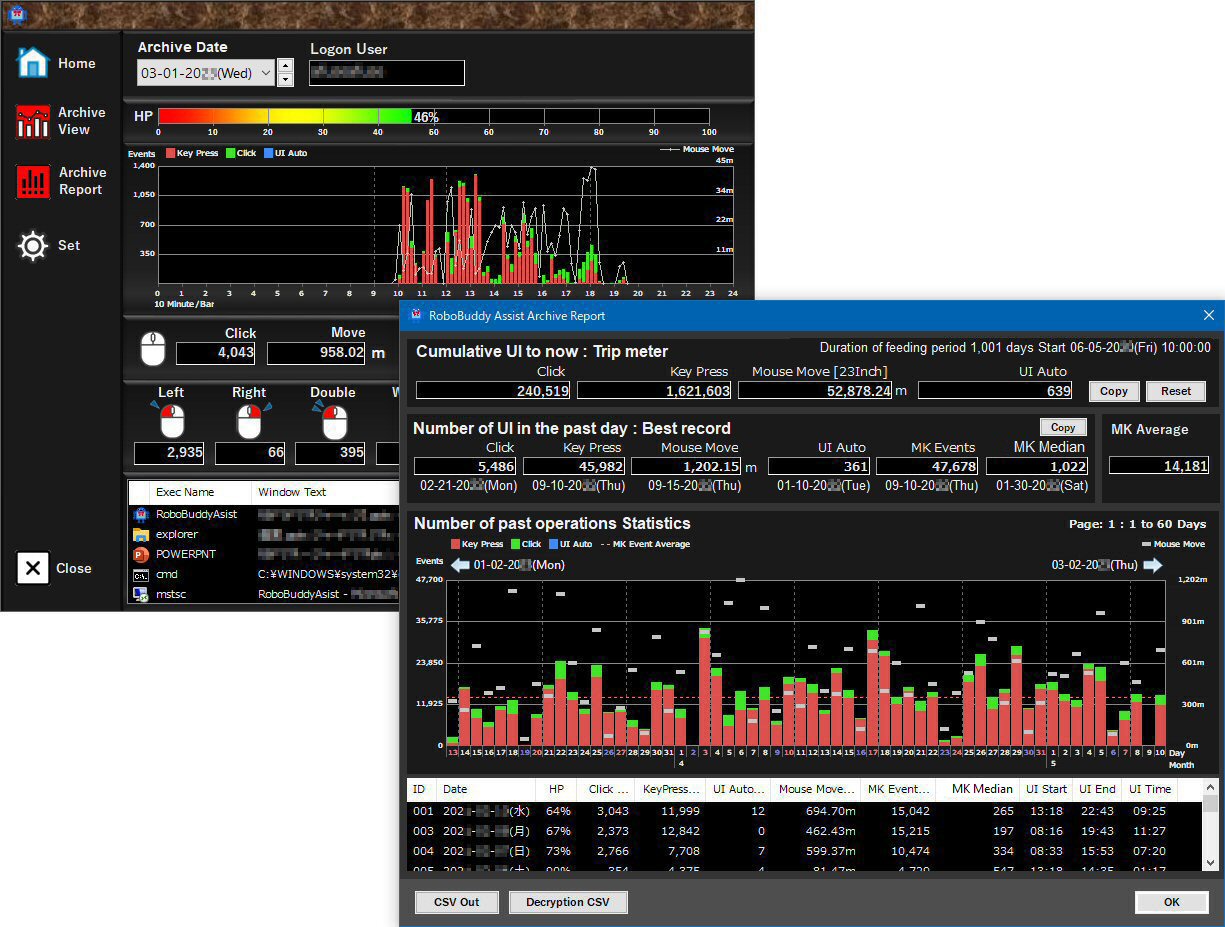 If Windows is set to Dark Mode, the software will display in black or dark gray. When starting the software, specify startup arguments to force it into dark or light mode, regardless of Windows display theme settings. -theme=light : Light mode -theme=dark : Dark mode *Arguments are case-insensitive. *Changing Windows theme requires restarting the software to apply changes. *The software uses standard Windows message boxes, which follow Windows default (light) theme. ■ Integration with Other Systems and Services To integrate with other systems or services, the following capabilities are required on the target PC (Windows): 1. Ability to execute commands. 2. Ability to retrieve files. RoboBuddy Assist can provide the following data to other systems/services: 1. Operation information per executable file for dates shown on the Home and Archive View screens. 2. Daily operation statistics shown on the Archive Report screen. Data for up to 365 days can be exported as CSV files without UI interaction. *This feature is available only in the Enterprise version. [Basic Integration Flow] This section demonstrates how to integrate our product Using RBF’s grid network, CSV files can be output and retrieved even when PCs move from office to home (telework). 1. AI Agent Robot Controller executes RoboBuddyAssist.exe on the target Windows PC.  2. AI Agent Robot Controller retrieves the CSV files output by RoboBuddyAssist.exe.  3. AI Agent Robot Controller aggregates CSV files from multiple users and registers the data to web services or other systems. RoboBuddyAsist.exe Command Arguments
One of the above arguments must be specified when exporting CSV. Arguments are case-insensitive. The command can be executed even if RoboBuddyAssist.exe is already running. No error message box is shown if the argument is incorrect or processing fails. Default CSV Output Path: [Installation Folder]/RoboBuddyAssist/CSV Default CSV File Names: -csvout=arcrep :ArcRep.csv -csvout=arcview :ArcView.csv Optional Arguments for CSV Output
[Example] Output Archive Report list for past 365 days to CSV: RoboBuddyAsist.exe -csvout=arcrep -csvpastdays=365 -csvfile="C:/Temp/ArcRepList.csv" Output Archive View list for past 365 days to CSV: RoboBuddyAsist.exe -csvout=arcview -csvpastdays=365 -csvfile="C:/Temp/ArcViewList.csv"
■ AI Agent Robot Controller Job Command Registration
Register the above as a Job Command. Next, open the Run Job screen for the above Job Command and save the execution schedule. Set to run on a weekly cycle: Days: Monday to Friday Time: 09:00 This schedule retrieves operation data up to the previous day at the start of the workday. Create another Job Command to aggregate operation data on the AI Agent Robot Controller PC. This Job Command should: ・Use RBF API FileTransfer() to retrieve CSV files (file transfer). ・Aggregate UI information from CSV files per user. ・Register aggregated data to other systems/services as needed. Register this Job Command as "RoboBuddy UI Data Aggregation." Set this Job Command to run on a weekly cycle: Days: Monday to Friday Time: 10:00 This schedule aggregates operation data after retrieval. Once both Job Commands are registered, execute them to complete the process.
■ ArcReport.csv File Column Descriptions
The first row contains column headers.
■ ArcView.csv File Column Description
The first row contains column headers.
■ Foreign Language Versions of Windows This software supports English and Korean display languages in addition to Japanese, based on the Windows "Display Language" setting. If the Windows display language is set to a language other than Japanese or Korean, the software will default to English. The English and Korean versions differ only in display language; the software’s functionality remains consistent across all supported languages. [Note] You can specify the display language of the software at startup using the following options: -lang=en :English display -lang=kr : Korean display -lang=jp :Japanese display * Argument characters are not case sensitive. By specifying these options at startup, you can display the software in English or Korean even if Windows is set to Japanese. The fonts used by the software are as follows: Japanese version: "Meiryo", "Yu Gothic" English version : "Segoe UI", "Arial" Korean version : "Malgun Gothic" ("맑은 고딕") *These fonts are standard fonts installed with Windows. If you experience garbled characters, you may need to install the appropriate fonts on Windows. Switching Windows display language from the specified language to another may cause past data to display garbled characters. If you wish to have the software display in your native language, please contact us . ■ Additional Information Please note that the specifications, features, and user interface described above are subject to change without prior notice. ■Trademarks Microsoft Windows is a registered trademark of Microsoft Corporation in the United States and other countries. The robot image of the Software Robot symbol mark is a registered trademark of AlterForce . AlterForce , Robowiser , RoboBuddy is AlterForce . A registered trademark of All company names, product names, and service names mentioned in this User Guide are trademarks or registered trademarks of their respective companies. |
|||||||||||||||||||||||||||||||||||||||||||||||||||||||||||||||||||||||||||||||||||||||||||||||||||||||||||||||||||||||||||||||||||||||||||||||||||||||||||||||||||||||||||||||||||||||||||||||||||||||||||||||||||||||||||||||||||||||||||||||||||||||||||||||||||||||||||||||||||||||||||||||||||||||||||||||||||||||||||||||||||||||||||||||||||||||||||||||||||||||

Copyright © 2014-2025; AlterForce Corporation. All Rights Reserved.
Count: